Integrating NetCrunch with Zendesk helpdesk
This article will show you how to configure NetCrunch to Integrate with the Zendesk helpdesk.
Enable NetCrunch to post in Zendesk
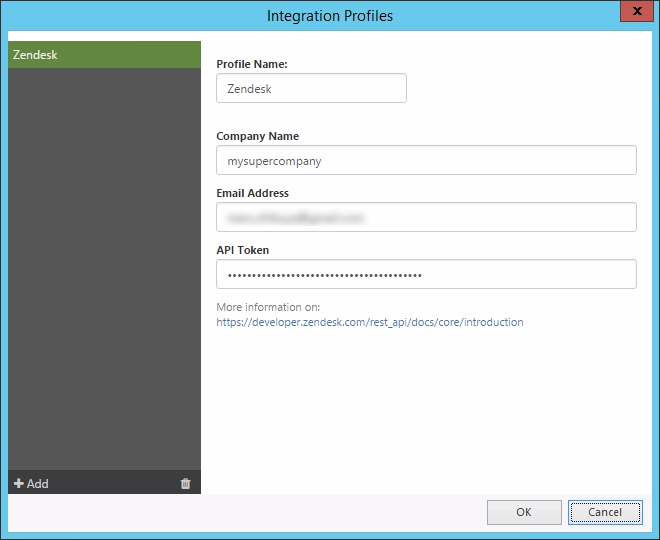
To enable NetCrunch to post important alerts directly to your Zendesk, you need to first set up an Integration Profile for Zendesk in NetCrunch. To do so, click Monitoring Integration Profiles at the top of the NetCrunch menu.
In the editor, the new Integration Profile needs to be named and you will be asked for your company name, which is part of your domain (i.e. test for https://test.zendesk.com), an email address, and an API token. Instructions on how to find the API token can be found at: API Token Instructions and scroll to "API token". You might want to consider creating a new user that will be used to send tickets from NetCrunch to clearly identify the sender.
Create an alert that sends tickets to Zendesk
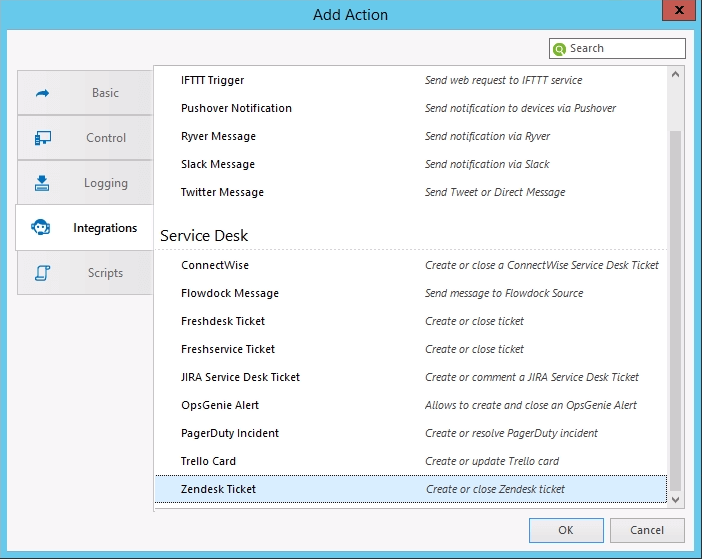
To allow NetCrunch to utilize this integration, it's necessary to create an alerting script (or edit the already existing one). Follow the steps below to create a new Alerting Script.
- Click Monitoring Alerting Escalation Scripts
- In the Alerting Scripts window click Add Alerting Script
- Click Add and select Action to Run Immediately
- Click Integrations tab and select Zendesk Ticket
A new window will appear without much to configure. Make sure that you are using the correct profile. Test sending messages to Zendesk by clicking Test. The test procedure will open in a small window. If everything has been set up correctly, the test should finish with a "Successfully executed" message, and a new test ticket should now appear in the Zendesk window.

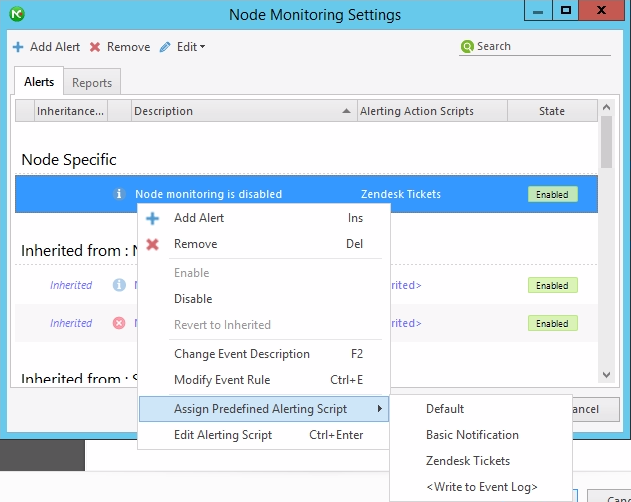
This procedure will not work with the "Close Ticket" operation, however. To test the "Close Ticket" operation you are going to need to create an alerting script with the "Create Ticket" operation set as an Action to Run Immediately, and the "Close Ticket" operation as an Action to Run on Alert Close. You are able to choose which status the updated ticket should receive for the "Close Ticket" operation. The default, in this case, is the status "Closed". Now, select a node in NetCrunch and create an alert (for example Node Monitoring Disabled) to test and assign the Alerting Script to this alert. The following steps explain how to create a "Node Monitoring Disabled" alert for a single node.
- Right-click the node where you want to create an alert
- Select the Node Settings and click Alerts&Reports in the node settings window
- Click Add Alert, select the Basic tab and choose Node monitoring is disabled
- Right-click the new Alert and select Assign Predefined Alerting Script Your Script name
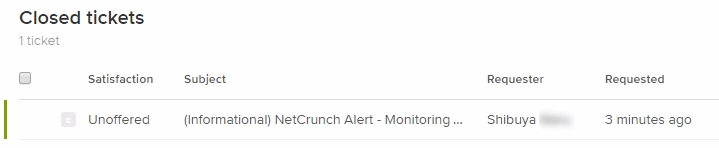
Triggering the alert (Disabling Node Monitoring) will now create a ticket in Zendesk. If this alert is closed (Node Monitoring Enabled), the ticket in Zendesk will be commented on and the status will be updated to your chosen status. If such an alerting script is attached to various alerts, NetCrunch will send tickets to Zendesk each time the given alert is generated on your machines.
- [19.05.2020]How to send tickets to Service Desk Plus
Service Desk Plus is a platform that can help you track the resolution of various cases that affect your business. This article will show you how NetCrunch integrates with Service Desk Plus.
- [20.04.2020] Integrating MessageBird with NetCrunch
MessageBird is a cloud communications platform that allows sending SMS notifications among other things. This article will help you configure NetCrunch to send SMS/text message notification through MessageBird.
- [14.12.2018]How to send NetCrunch notification messages to Microsoft Teams
Microsoft Teams is the digital hub that brings conversations, content, assignments, and apps together in one place. This article will help you configure NetCrunch to send notification messages right into the Microsoft Teams channel.
- [10.12.2018]How to send NetCrunch notification messages via Amazon Simple Notification Service
Amazon Simple Notification Service is a web service that enables applications, end-users, and devices to instantly send and receive notifications from the cloud. This article explains how to configure NetCrunch to send notification messages via Amazon SNS.
- [29.11.2017] Converting NetCrunch alerts into tickets in the Mojo Helpdesk
View step-by-step instructions on setting up your NetCrunch to send tickets to your Mojo Helpdesk.
- [04.11.2017] Integrating NetCrunch with Clickatell SMS gateway
This article will show you how to configure NetCrunch to work with Clickatell text messaging platform.
- [16.10.2017] Using NetCrunch to create tickets in LiveAgent Helpdesk
LiveAgent is one of the most popular helpdesk software for SMBs. This article will explain and show how to set up two-way integration between NetCrunch and LiveAgent Helpdesk.
- [25.09.2017] Sending NetCrunch alerts to Ryver
For companies who do not want to use Slack as a chat, Ryver is a good alternative. It's a free communications tool that needs little to no configuration to get started with. This article will explain how to configure NetCrunch to send messages into a Ryver Team chat.
- [07.09.2017] Sending NetCrunch notifications with Pushover
If your company uses Pushover for business communication, you can now easily make NetCrunch part of your communication within Pushover. Pushover sends the received NetCrunch notifications directly to your specified devices via the Internet. This article will focus on how to configure NetCrunch for this integration.
- [17.08.2017] Sending NetCrunch alerts in Flowdock
One of the new features in NetCrunch is the possibility to integrate with Flowdock and to create tickets in the Flowdock Inbox for alerts. This article explains how to set up and configure a Flowdock integration.
- [18.07.2017] Forwarding NetCrunch alerts to OpsGenie
NetCrunch alerts can happen at any time, but sometimes they need the attention of someone who is not the NetCrunch user. With OpsGenie those alerts will be posted to OpsGenie Alerts Page as tickets and can trigger Notifications to the email address or the mobile as an SMS (text message), voice message, or mobile app. Here we will show you how to configure a NetCrunch integration with OpsGenie.
- [12.06.2017] Creating Freshdesk tickets from NetCrunch alerts
Integrating NetCrunch with the help desk tool that you are already using is possible without additional programming. In this article, we will explain how to set up your NetCrunch to convert alerts into tickets in your Freshdesk Service Desk.
- [16.05.2017] Forwarding NetCrunch alerts to HipChat
When an important alert comes up, sometimes it's beneficial for that alert to be sent directly to the person best suited to fix the problem. This can be achieved by integrating NetCrunch with a team collaboration system, such as HipChat. See how to configure your NetCrunch-HipChat integration.
- [12.04.2017] Sending NetCrunch alerts as tasks to Asana
Asana is a web-based application to help you make the planning and execution of your projects much easier by breaking them down into tasks. In this article, we will describe how to configure your NetCrunch to send alerts as tasks directly into your asana Projects to enable your team to resolve them as part of their asana Projects.
- [01.03.2017] Integrating NetCrunch with Connectwise
It is usually more convenient to integrate NetCrunch with the system that you are already using. This is the reason we have created an integration with Connectwise, a very detailed and comprehensive Service Desk. This article explains how to set up NetCrunch to send tickets to your Connectwise Service Desk.
- [11.02.2017] Sending NetCrunch alerts to Freshservice
Next to Freshdesk, there is another Service Desk that helps you keeping track of your Problems. Freshservice is a Service Desk especially created for your IT-Department to react to internal IT issues and to promote them to problems if they are constantly reoccurring. This helps your IT Department to find the source of the problem and eliminate it quickly. This article will explain how to configure NetCrunch to send tickets to your Freshservice Service Desk.
- [19.01.2017] Trigger IFTTT actions with NetCrunch alerts
See how to set up your NetCrunch IFTTT integration and create an IFTTT Recipe.
- [10.01.2017] Creating tickets in locally hosted JIRA Service Desk with NetCrunch
See how you can configure your NetCrunch to forward alerts and convert them into tickets in the JIRA Service Desk hosted on your local server.
- [15.12.2016] Creating tickets in JIRA Service Desk (Cloud application) with NetCrunch
See how you can configure your NetCrunch to forward alerts and convert them into tickets in the JIRA Service Desk hosted in the Atlassian Cloud.
- [30.10.2016] Sending Tweets and Direct Messages on Twitter with NetCrunch
In some cases you need an efficient way to quickly let your users know that your service is temporarily unavailable or is back running. The fastest way to inform them is usually via your social media channel. Now NetCrunch is able to do this automatically: this article will explain how to configure NetCrunch to send a public Tweet or a direct Twitter message from your maintenance staff to all or selected Twitter followers.
- [05.09.2016] Sending NetCrunch alerts to PagerDuty
See how you can configure your NetCrunch to forward alerts and convert them into incidents in the PagerDuty
- [30.01.2018] How to send tickets to JitBit
JitBit Helpdesk has become quite popular recently. Due to its popularity, we decide to add the integration with JitBit into NetCrunch. This article explains how to configure NetCrunch to send tickets to JitBit.
- [20.12.2017] How to send alerts to AlertOps
AlertOps is a major incident management system that helps IT Operations manage and optimize their alerts. This article will show you how to enable integration and send alerts directly from NetCrunch into AlertOps.
- [05.01.2018] How to send SMS/text messages via SMSEagle gateway
SMSEagle is a hardware SMS Gateway. NetCrunch can use it to provide SMS-based notifications. This article will explain how to configure and utilize this feature.
- [08.08.2016] Sending NetCrunch alerts to Slack channel
You can use NetCrunch to send notifications and messages to various web services. In this article, we will explain how to configure your NetCrunch to send messages to a Slack channel.