Enabling SNMP on a Windows machine
Despite the fact, that Microsoft depreciated SNMP for the Windows Server 2012 onwards, it is sometimes necessary to enable SNMP in this system. Below you will find a simple walkthrough how to do it.
Quick overview
Installation of the SNMP service on machines with various versions of Windows Server follows a similar route:
- You have to enable this feature in the Server Manager directly in Windows OS
- You need to configure SNMP, adjusting e.g. security parameters
This short article covers enabling SNMP on machines with Windows Server 2019 - however, it applies to all Windows Server versions currently supported by Microsoft, such as:
Installation of the service
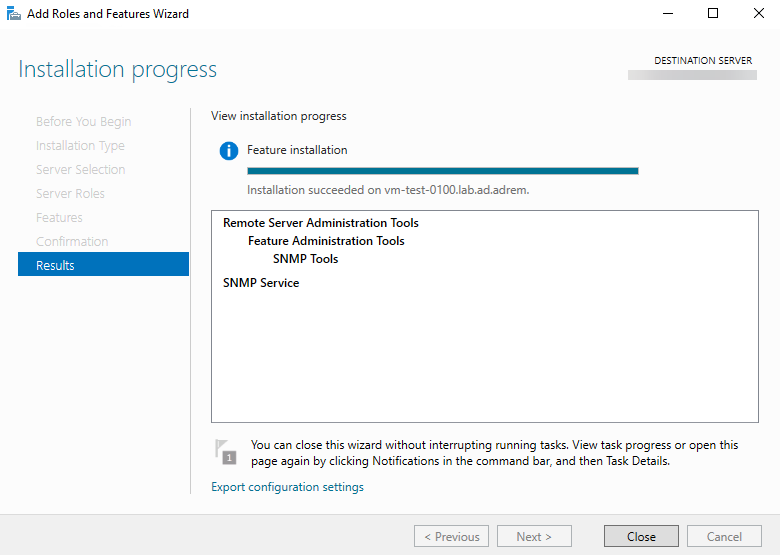
Installation of the SNMP Service with Server Manager is pretty straightforward because the wizard guides you through the whole process. In short - it goes like this:
- Choose feature-based installation and desired server where you want to enable SNMP,
- Select 'File and Storage Services' and SNMP Service,
- Click on 'Add Feature', click 'Next' then 'Install'.
After installation is finished, a confirmation screen should be displayed:
Configuring the service
Now, having the SNMP service installed, it is time to configure it properly. Do the following:
- Run services.msc from Windows Administrative Tools,
- Locate 'SNMP Service' on the list and double-click to change its properties,
- Select the 'Security' tab, make sure 'Send authentication trap' checkbox is marked and provide whitelist for the hosts, from which SNMP packets should be accepted,
- Provide accepted community names and their rights (as a rule of thumb it should be a READ ONLY unless it's a community string used for configuration management).
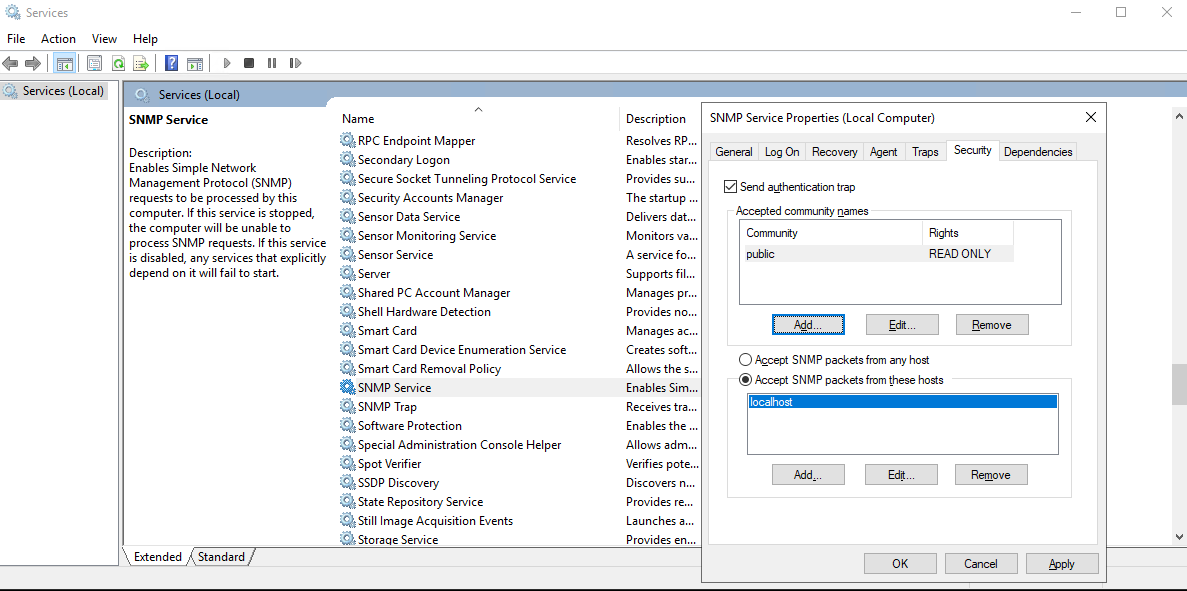
With security settings configured, change startup type and service status according to your needs in the 'General' tab. Also, you can add Traps destinations to the list (in the 'Traps' tab), e.g. to receive the authentication trap from step #3, by typing Hostname and IP or IPX address to the relevant box, then save the settings.
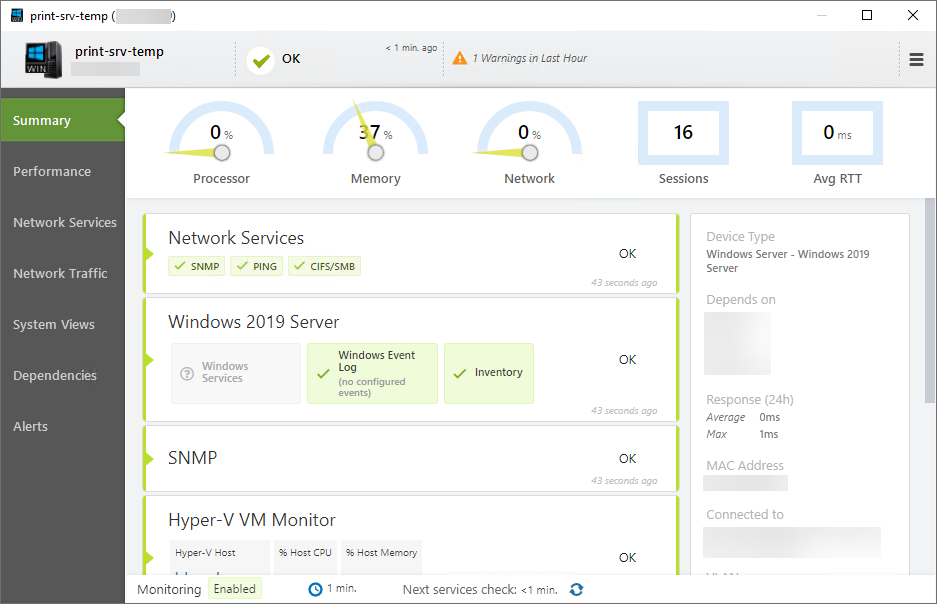
And voilà, you can now use SNMP to monitor e.g. your printer server using NetCrunch:
Summary
As you can see above, even if Microsoft depreciated it, enabling and configuring the SNMP service on the Windows machine is still quite an easy task.
It is worth noting, that with NetCrunch you can use it to monitor the health state of your SNMP devices in many ways, from a simple check if the service is responding, to the more complex queries, with highly specialized features such as Generic CMYK Printer Monitoring Pack / Printer Sensor.
Reference
- [15.03.2020]Windows VPN Monitoring with NetCrunch
Remote work is growing and sometimes indispensable. There is a number of different VPN services that can be used to provide secure access to company networks for remote workers or those traveling away from the office. This article will describe how to set up VPN Monitoring in NetCrunch on the example of Windows VPN
- [30.01.2020] Monitoring of Windows Shared Cluster
Monitoring Windows Shared Clusters can be achieved in many different ways. This article demonstrates the power of NetCrunch scripts combined with data parsers to show you how easy and fast it is to setup NetCrunch to collect data about free and used space on clusters
- [15.12.2019] How To Monitor Any Device With SNMP
Here's an SNMP primer for any junior person on your IT team - they may actually be younger than the protocol itself. After all these years, for most devices that you need to monitor, starting with SNMP before you try anything else is a safe bet.
- [08.02.2019]SNMP monitoring features in NetCrunch
There is a lot of the ways of how we can monitor the condition, performance and availability of the devices with available SNMP service running on them. Learn how to gather the counters and states from various devices with the tools available in the NetCrunch.
- [24.01.2019]Monitoring complex instances of the SNMP counters
Sometimes the SNMP counter identifier is placed in a different table than a counter. NetCrunch 10.5 introduces a new way of monitoring such complex instances.
- [20.01.2019] Monitoring operating systems - Windows System Views
System views is a powerful tool to see the status of various aspects of the given system in real time. This article will focus on System Views on Windows-based machines
- [12.11.2018] Windows Server Monitoring
Use NetCrunch to monitor Windows Server resources, services, and metrics. Gain control and insight of your Windows Server infrastructure health with full monitoring and trend data collection from the entire Windows Common Information Model (CIM).
- [17.08.2018]Printer monitoring in NetCrunch
Use NetCrunch printer sensor to get information about the status of the printer and the ink level.
- [06.07.2018]Analyze Windows failed login events with a custom log view
Use NetCrunch to monitor and display failed logon activity on all Windows machines in your network by monitoring Windows Event Log.
- [25.06.2018]How to start monitoring of new SNMP device with NetCrunch
Is your device monitorable? Read the article to learn how to approach configuring monitoring for a new device.
- [28.05.2018]Monitoring Windows Event Logs for Warnings and Errors.
Learn how to monitor Windows Event Log to receive alerts and notifications when event with specified id appears.
- [12.02.2018]Process Monitoring with NetCrunch WMI Sensors.
Learn how to configure a node-specific WMI Object sensor to monitor a specific Windows process and generate an event when the process is restarted. This sensor-based monitoring strategy leverages the uniqueness of PID, against the generic name of a process.
- [05.04.2017] Using NetCrunch to track Port Security status of Cisco switches.
Cisco port security is a great feature to make your network safer. Learn how to configure NetCrunch to display the status of Cisco Port Security on the switch interfaces.
- [24.05.2016] Correct Monitoring of Windows Processes on multi-core machines
This article will explain how NetCrunch monitors Windows processes and why these values are wrong in perfmon.
- [21.04.2016] Monitoring External Events in NetCrunch
Using multiple tools to catch every SNMP trap or SYSLOG message might be hard. NetCrunch simplifies this task with the External Events window and lets you fine-tune your log and SNMP monitoring:
- [07.04.2016] Optimizing SNMP Monitoring in NetCrunch
This article will explain reasons for most common SNMP monitoring problems, describing ways to fine-tune SNMP monitoring settings in NetCrunch. Learn how to monitor without stressing your SNMP device.