Using iMacros with NetCrunch
Read how you can use iMacros for web page monitoring and send results to NetCrunch Open Monitor. You can also set status of monitoring on the graphical map using widgets. This sample was created using iMacros Enterprise Edition.
In this article we describe some use cases for iMacros and how they can be monitored with NetCrunch Open Monitor. This documentation was created using iMacros Enterprise Edition.
Monitor login to a webpage
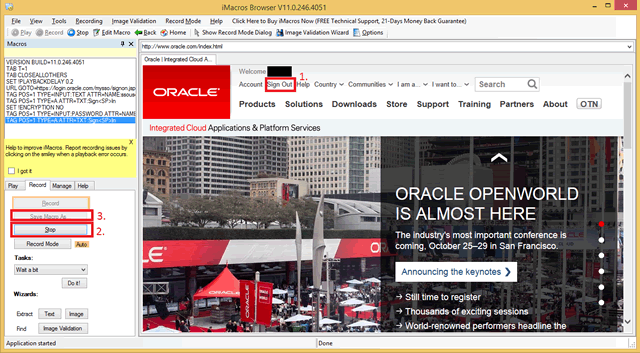
Record Macro
After the installation is completed use the iMacros browser to record a macro or download [oracle login.iim](oracle login.iim) (you still need to adjust the login data).
Choose a webpage which you want to monitor (e.g. Oracle webpage) Click "Record" and choose "Sign In/Register".
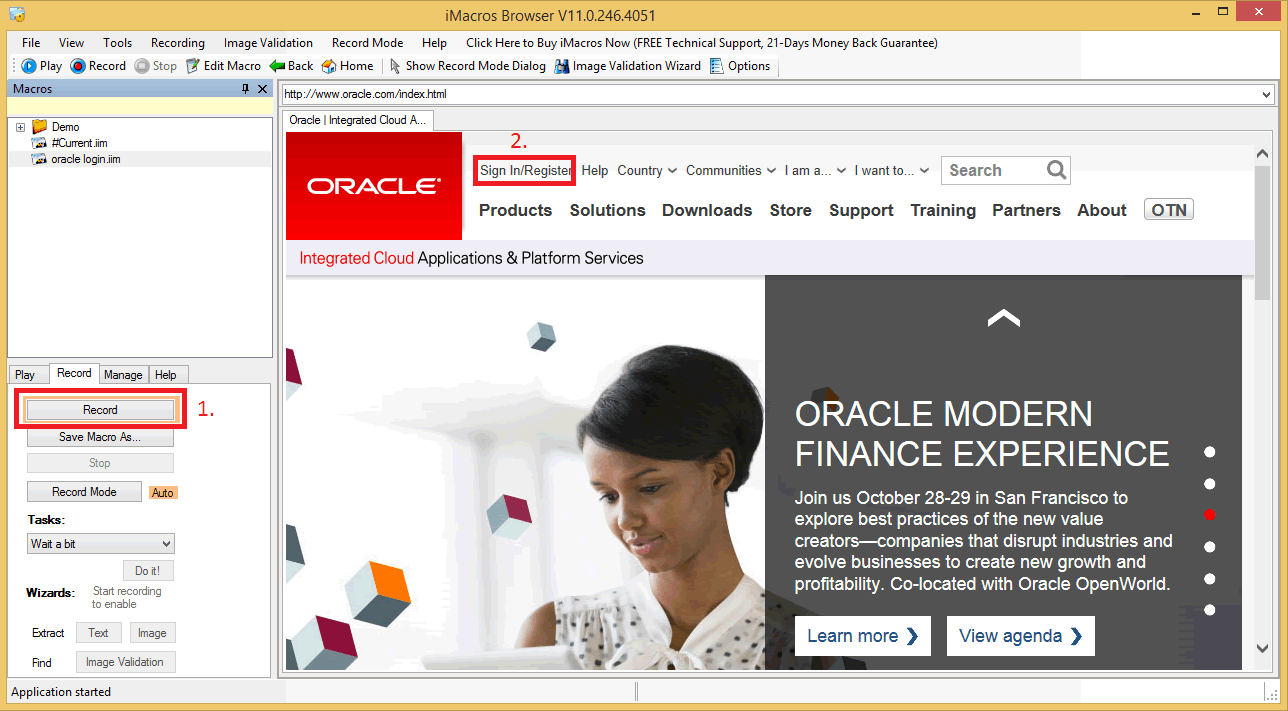
Fill in the form and click "Sign In".
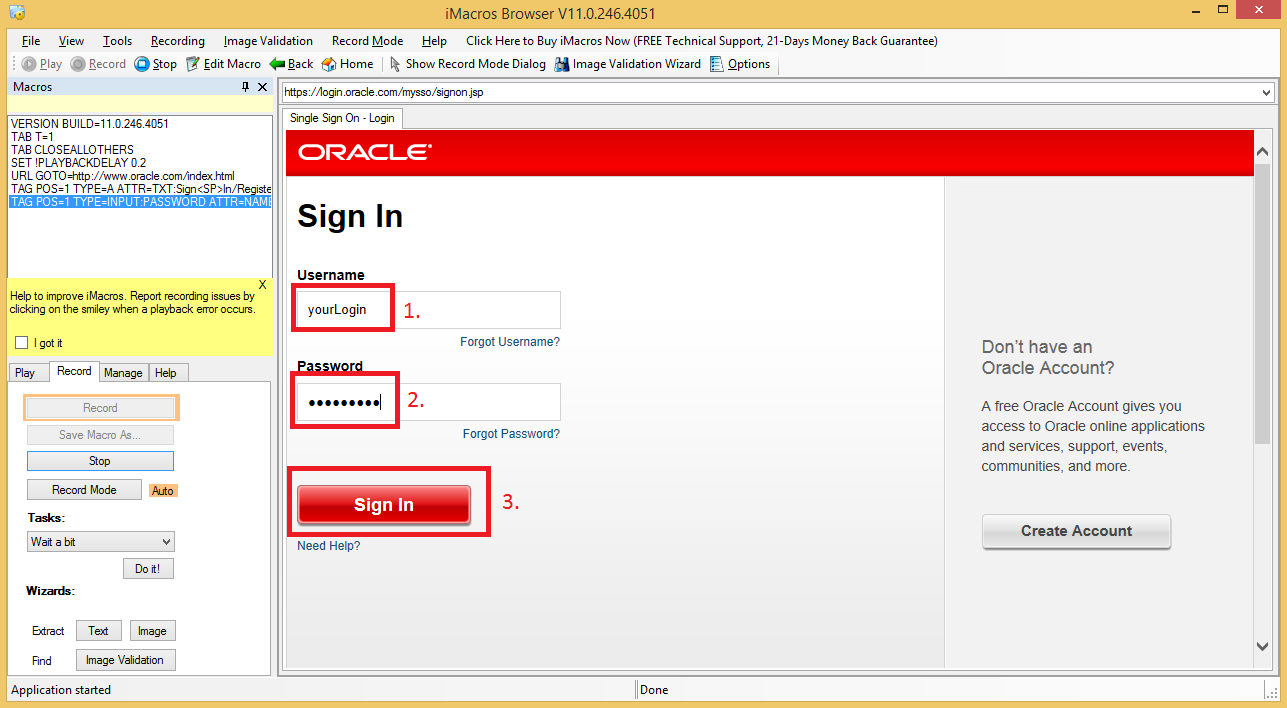
In the end sign out and stop the recording and save the macro (e.g. oracle login.iim).
Edit the Macro
If it's necessary make changes on the recorded macro by right click on the macro name in the macro overview in the top left corner of the program.
In our example we need to edit the "GOTO" line since the recorded URL will throw an error.
Change this line to:
http://www.oracle.com/webapps/redirect/signon?nexturl=http://www.oracle.com/index.html
The macro should now look something like this:
         VERSION BUILD=11.0.246.4051
         TAB T=1
         TAB CLOSEALLOTHERS
         SET !PLAYBACKDELAY 0.2
         URL GOTO=http://www.oracle.com/webapps/redirect/signon?nexturl=http://www.oracle.com/index.html
         TAG POS=1 TYPE=INPUT:TEXT ATTR=NAME:ssousername CONTENT=YOURLOGIN
         SET !ENCRYPTION NO
         TAG POS=1 TYPE=INPUT:PASSWORD ATTR=NAME:password CONTENT=YOURPW
         TAG POS=1 TYPE=A ATTR=TXT:Sign<SP>In
         TAG POS=1 TYPE=A ATTR=TXT:Sign<SP>Out
In the Tab "Manage" under Options you can activate "Profile macro performance" and "Open Performance Log" to see the results of the script.
You can now run your script to see if it works.
Script to use with Open Monitor
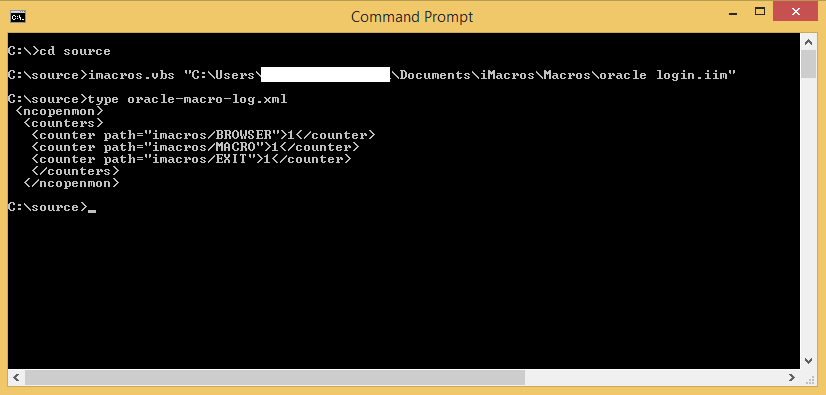
If everything with the script is okay, write a script which converts the output to a format readable by Open Monitor.
In this example the Visual Basic Script (imacros.vbs) takes the macro as an argument and creates an output file "oracle-macro-log.xml" which is conform with the Open Monitor xml file format.
      Dim objFileSystem, objOutputFile
      Dim strOutputFile

      Const OPEN_FILE_FOR_APPENDING = 8

      'Logfile name
      strOutputFile = "./oracle-macro-log.xml"
      Set objFileSystem = CreateObject("Scripting.fileSystemObject")
      Set objOutputFile = objFileSystem.CreateTextFile(strOutputFile, TRUE)

      'Open Monitor xml begin tags
      objOutputFile.WriteLine(" <ncopenmon>" & vbCrLf & "  <counters>")

      If WScript.Arguments.Count = 1 Then
         Macro1 = WScript.Arguments.Item(0)
      Else
         Wscript.Echo "Usage: start-ie.vbs Macro1"
         Wscript.Quit
      End If

     set iim1= CreateObject ("imacros")

     'Start browers
      iret = iim1.iimInit ("-tray")

     'Browers start log
     objOutputFile.WriteLine("   <counter path=""imacros/BROWSER"">"+cstr(iret)+"</counter>")

     'Run the macro
     iret = iim1.iimPlay(macro1)

     'Macro log
     objOutputFile.WriteLine("   <counter path=""imacros/MACRO"">"+cstr(iret)+"</counter>")

     'Close browers
     iret = iim1.iimExit(1)

     'Exit log
     objOutputFile.WriteLine("   <counter path=""imacros/EXIT"">"+cstr(iret)+"</counter>")

     'Open Monitor xml end tags
     objOutputFile.WriteLine("   </counters>" & vbCrLf & "  </ncopenmon> ")

     objOutputFile.Close
     Set objFileSystem = Nothing
     WScript.Quit(0)
In the string "strOutputFile" the name of the output file is stored. "iim1.iimInit ("-tray")" describes the browser which is opened. In this example the internal browser is used. It is set with the "tray" option to only open in the system tray. See the iMacros Wiki iimInit for more options. These values should be changed if necessary.
Run the script
To run the script manually open a command prompt ("cmd") (With Administrative Privileges) and execute the script "imacros.vbs" with the macro "oracle macro.iim" as a parameter. Make sure to us the absolute path for the macro.
More information about the Return Codes of iMacros can be found in the iMacros Wiki page Error and Return Codes.
To see how an error case would behave change in the "oracle login.iim" the username or password to a not valid value (e.g.: "TAG POS=1 TYPE=INPUT:PASSWORD ATTR=NAME:password CONTENT=wrongpw"). Re-run the script.
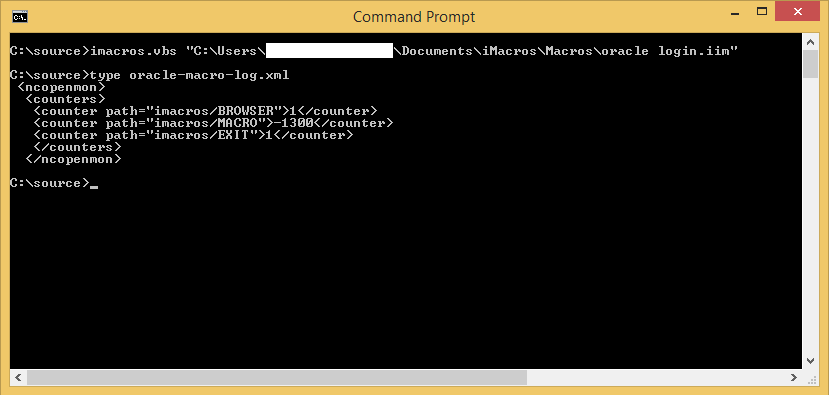
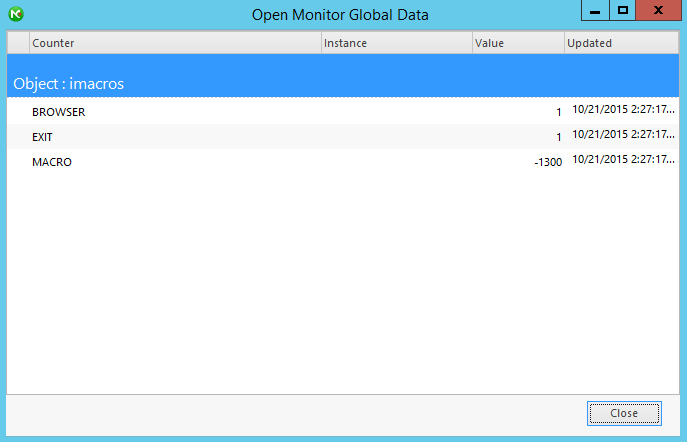
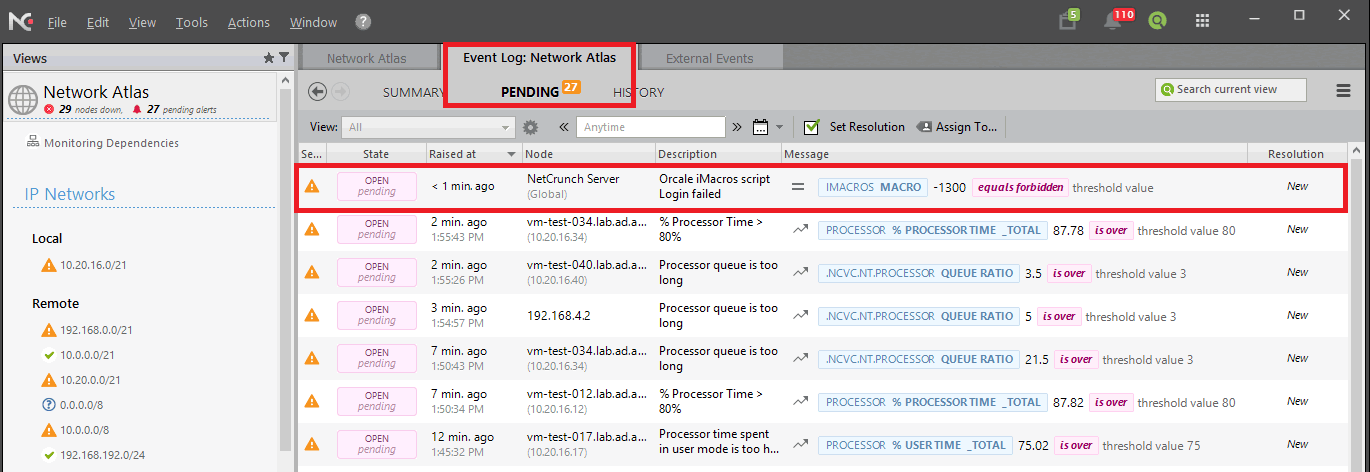
The macro now returns an error code "-1300" ("Html Element Not Found: Cannot find HTML element.") which means that after the failed login the script tried to sign out but couldn't find the sign out element since this element doesn't exist. The script can be run automatically by the Windows Task Scheduler if that is desired.
Alerts with Open Monitor
To use the data gathered with Open Monitor you can use "Monitoring Packs".
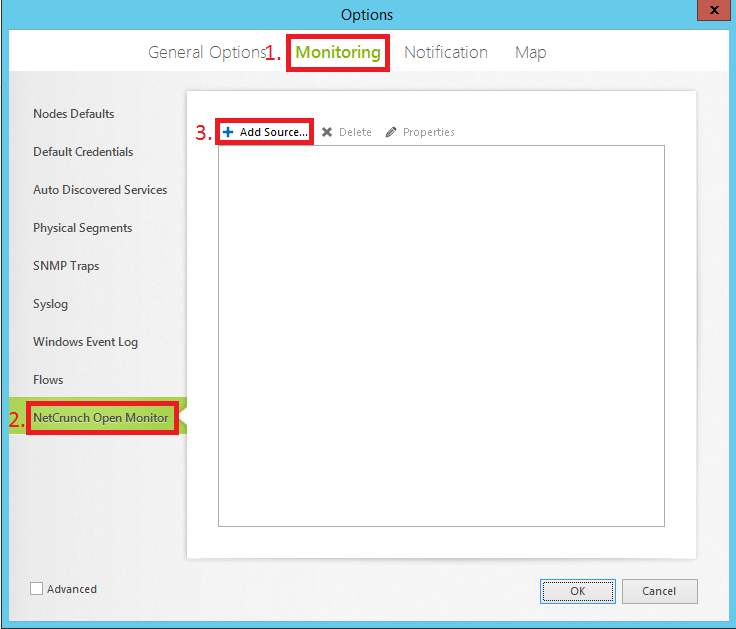
Including the data source into NetCrunch
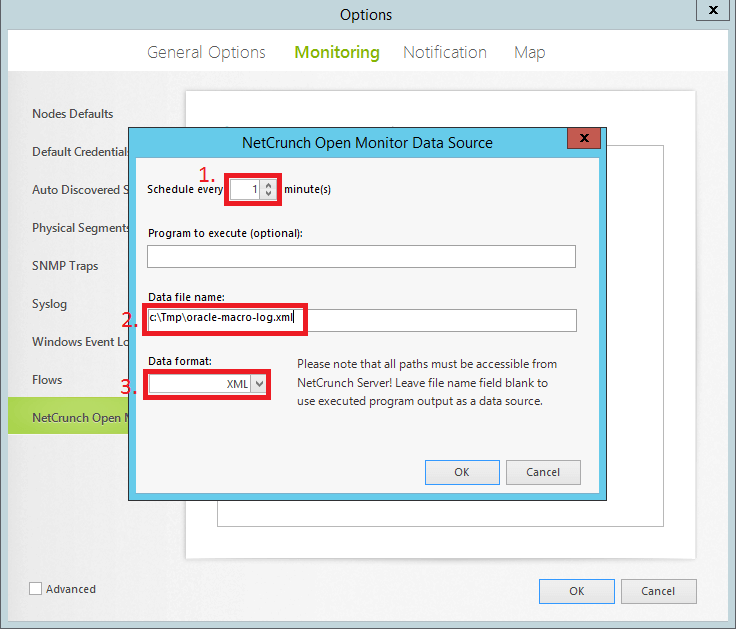
Go to "Tools", "Options", under the tab "Monitoring" select "NetCrunch Open Monitor" and "Add Source..."
Select "File" and configure the data file settings.
To check if the data is received go to "Tools", "NC Open Monitor Data" and check the output.
Creating an alert
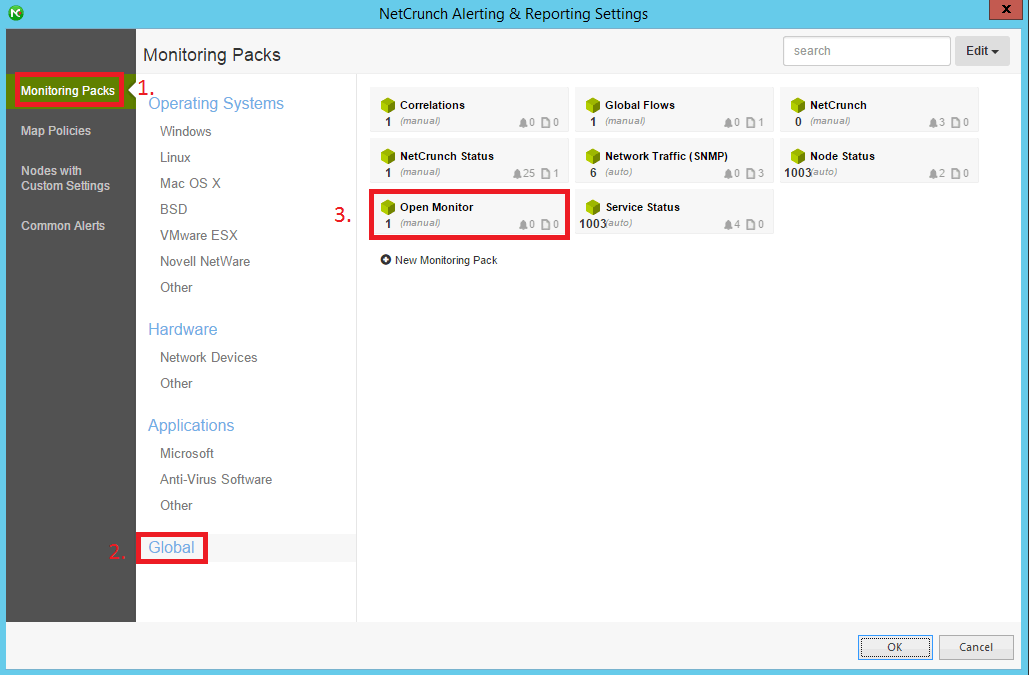
To set the alert go to "Tools", "Alerting & Reporting" and under "Settings" you find "Monitoring Packs".
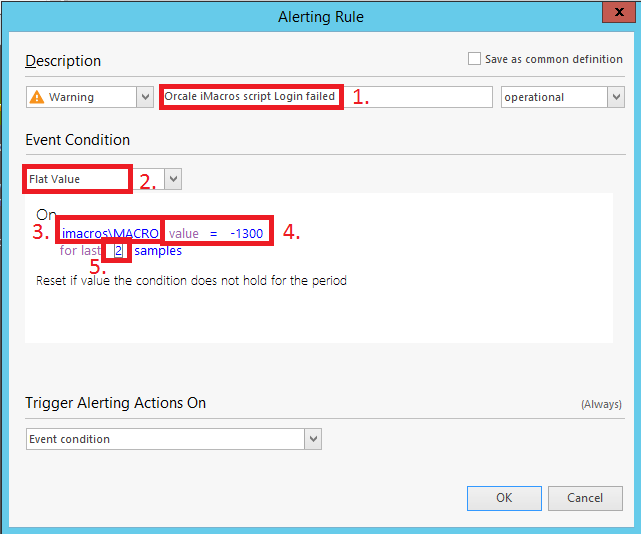
In the "Monitoring Pack Settings" click "Add Alert". Adjust the "Alerting Rule" as shown below. Under "select counter" (3.) you can choose from different Open Monitor counters. Set the error value you expect in 4 (iMacros Error and Return Codes). In 5. you can set the sample size. Since we choose an interval of 1 minute in the Open Monitor Data Source we should select here a sample size of 2.
This alert should now show up under pending alerts if it meets the criteria.
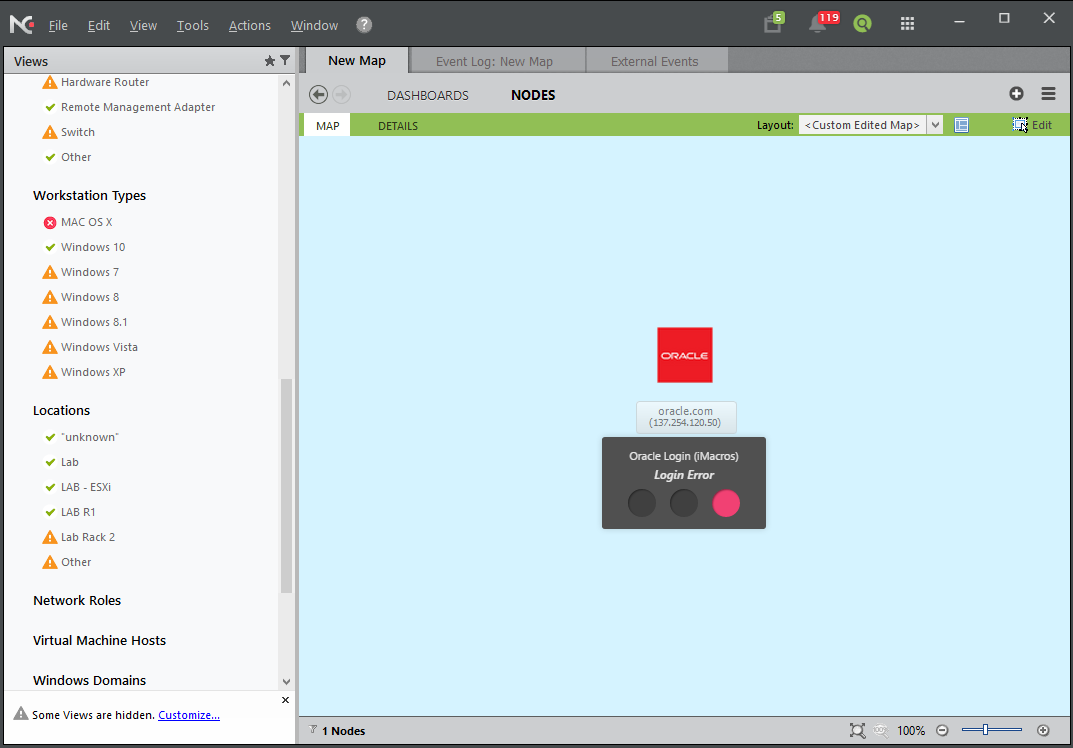
Creating a map with widgets
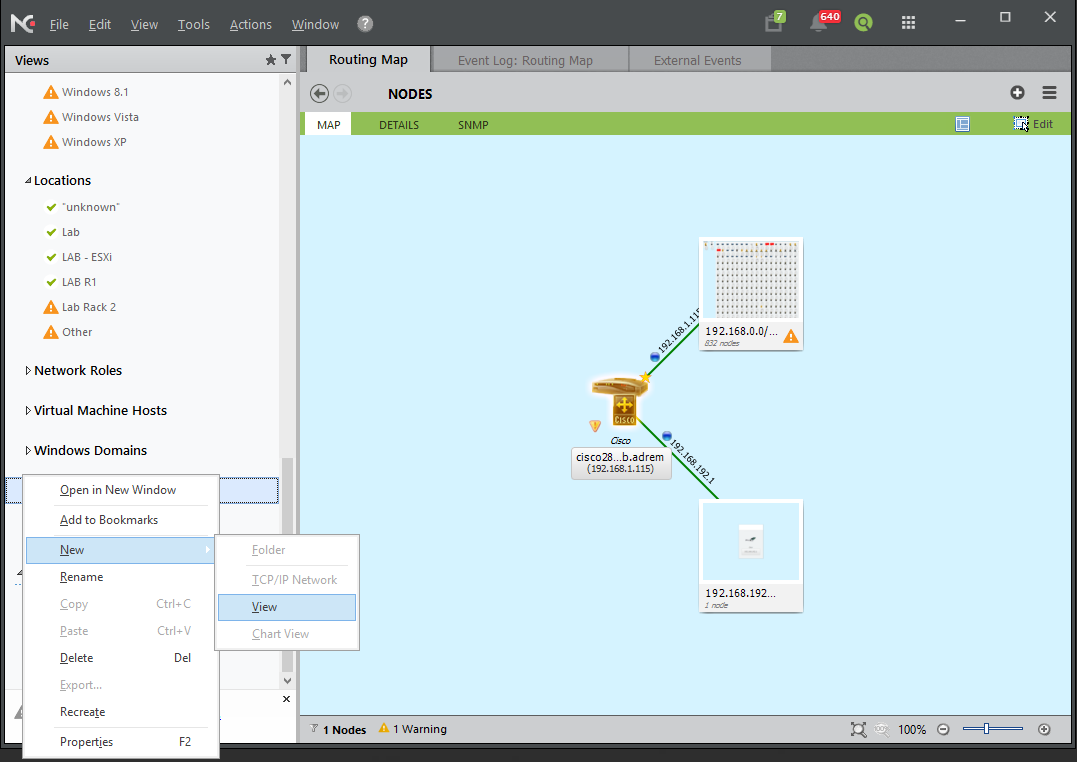
Now you can create a new Map and add some widgets which will display the status. Right click in "Views" and select "New", "View" in the following window choose "Blank Map".
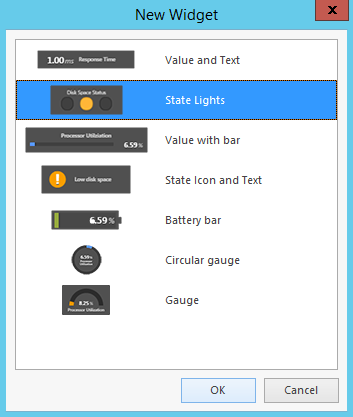
Right click in to the empty Map will give you the option to "Insert" a new "Data Widget". Choose a widget (we will use State Lights in this example).
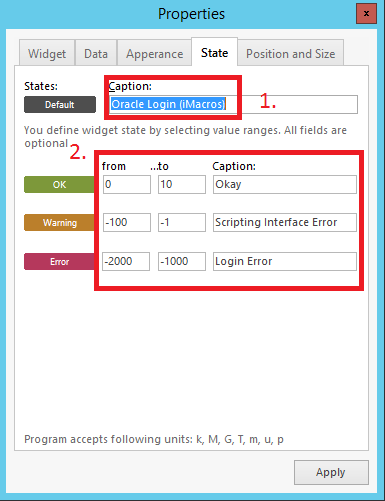
In the tab "Data" set the following settings:
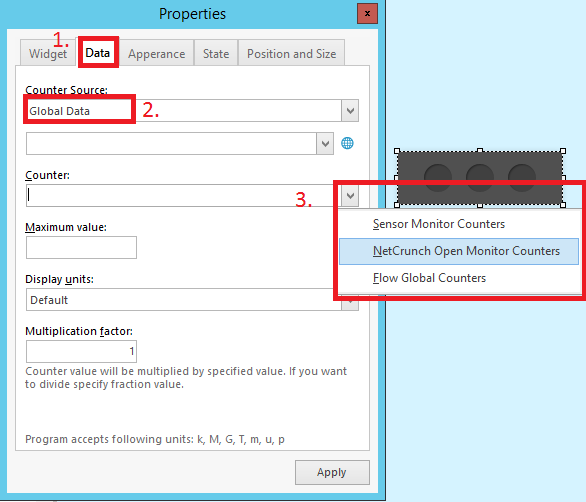
In the following window choose the Counter (here: MACRO) and "Add" it.
Now you can adjust the "State" and "Apply" the changes. The values refer to the iMacros error codes.
Adding a new Node
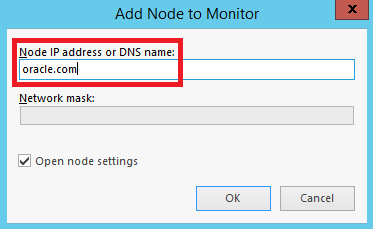
To optimize the view it is possible to add the webpage as new node. Right click on the map, "Insert", "New Node" and add the address in the following field.
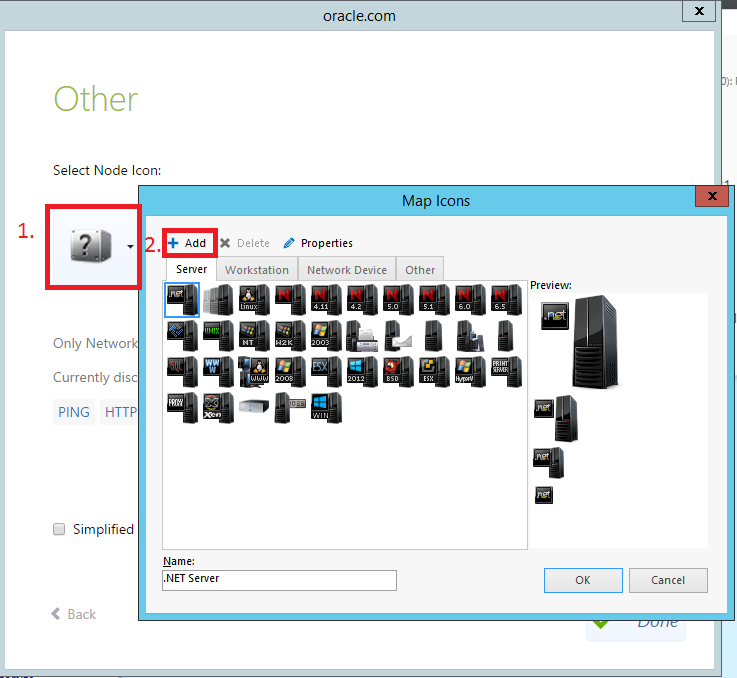
Choose "Other" as a Node type in the next window. You can select your own "Node Icon" by adding an icon to the icons list.
The View will now look something like this: