Using NetCrunch to track Port Security status of Cisco switches.
Cisco port security is a great feature to make your network safer. Learn how to configure NetCrunch to display the status of Cisco Port Security on the switch interfaces.
About Cisco Port Security:
Port security is a traffic control feature. It enables an administrator to configure individual switch ports in order to allow only a specified number of source MAC addresses accessing the port. You can read about port security in the official Cisco guide.
Configuring SNMP View to display Port Security status
After Port Security is configured on your switch, the next step is to make sure that the node where this feature is configured is correctly monitored by NetCrunch. The node needs to have SNMP enabled with proper community credentials to get the data we are interested in.
-
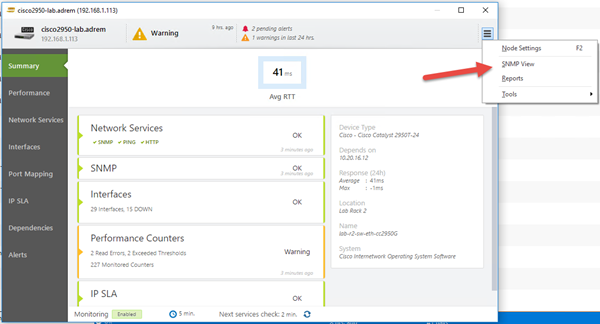
Open node status, click on menu icon located in the top right corner and click on SNMP view.
-
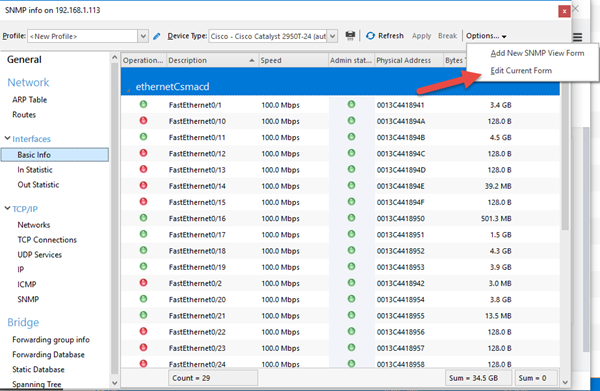
Switch to Basic Info in the Interfaces category, click on Options and then Edit Current View Form
-
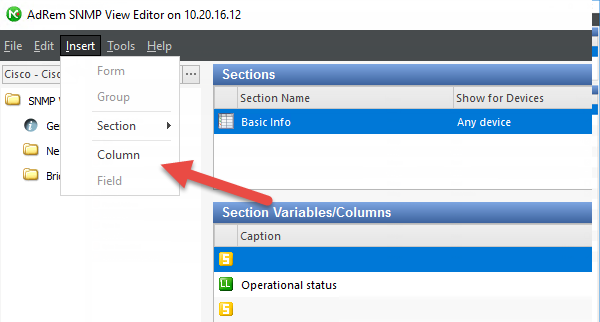
After SNMP View Editor appears, click on Insert in top Menu and select Column
-
Select Local Lookup and hit next.
-
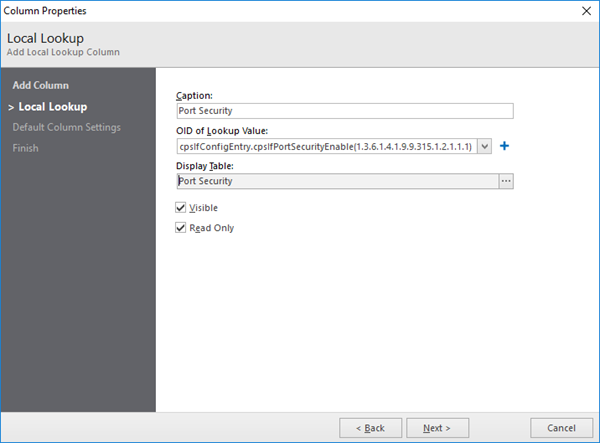
Name your column in Caption - for this purpose we will use the name: Port Security
-
Click on the blue cross icon to define the new OID, provide the Caption and enter: 1.3.6.1.4.1.9.9.315.1.2.1.1.1 in the OID section. This OID represents the status of Port Security on interfaces.
-
One last thing to do is to map values to "understandable" statuses - click on the [...] button in Display Table box.
-
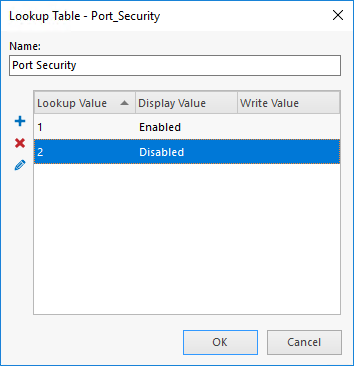
Click on the blue cross icon and provide the name (Port Security) - save and then double click on the table you just created.
-
Add new lookup table value by clicking on the blue cross icon. Fill in the first box with the value "2", the second box should have "Disabled" text in it.
-
Add second lookup table value - this time the value should be "1" and the text should be "Enabled"
-
After configuration - your Column Properties window should look like the screen below
-
Save everything and close the SNMP View Editor window.
-
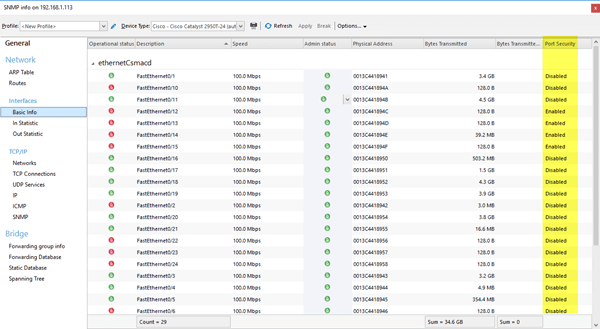
In the result, the new Port Security column is displayed that represents the current status of Port Security on the interfaces of the switch.
Alerting about changes in Port Security status
It is also possible to get alerting about Port Security changes. To add such alert we will use the already known oid. Please follow the steps given below:
- Open Node Settings of switch, on which you want to configure alerts
- Under the
SNMPsection, please clickCustomtile - In
Alertstab, please use + Add Alert button - Select and double-click
New Event for SNMP Variable Value - Click on the
<Select SNMP Variable> - In the
Enter OID...field enter 1.3.6.1.4.1.9.9.315.1.2.1.1.1 oid - Click Next button
- Select an instance (The port number), that you want to monitor
- Click OK button
- Next to the
Equals toplease enter 2 (2 meansDisabled, 1 meansEnabled) - Enter the alert description
- Save all settings
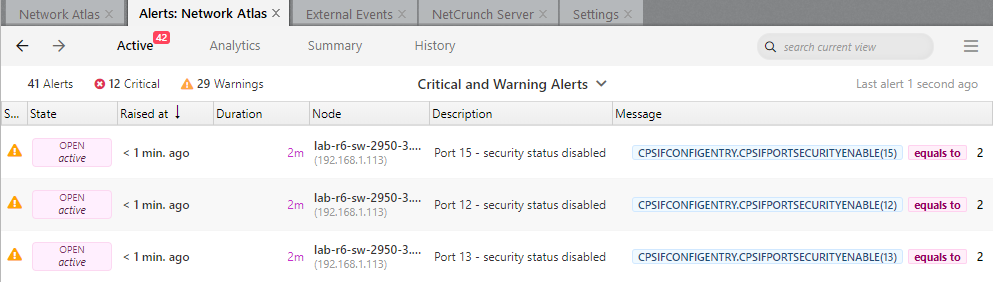
If you want to monitor more than one port, you should add other alerts using the steps above, and select other ports in step 8.
- [04.03.2021] Troubleshooting SNMPv3 monitoring issues
SNMPv3 protocol is the latest and most secure version. Encryption and authentication may take their toll on the v3 traffic so in many cases admins decide to stay on v2. Yet sometimes you need to go for it. Learn what to check if you encounter issues with SNMPv3 monitoring.
- [11.08.2020]How to configure SNMP traps for ESXi/ESX 3.5, 4.x, and ESXi 5.x hosts
Monitoring the health of older ESX/ESXi systems can be implemented by enabling SNMP and setting up SNMP traps to track performance events. Learn how to set it up.
- [26.03.2020]Enabling SNMP on a Windows machine
Despite the fact, that Microsoft depreciated SNMP for the Windows Server 2012 onwards, it is sometimes necessary to enable SNMP in this system. Below you will find a simple walkthrough how to do it.
- [15.12.2019] How To Monitor Any Device With SNMP
Here's an SNMP primer for any junior person on your IT team - they may actually be younger than the protocol itself. After all these years, for most devices that you need to monitor, starting with SNMP before you try anything else is a safe bet.
- [08.02.2019]SNMP monitoring features in NetCrunch
There is a lot of the ways of how we can monitor the condition, performance and availability of the devices with available SNMP service running on them. Learn how to gather the counters and states from various devices with the tools available in the NetCrunch.
- [24.01.2019]Monitoring complex instances of the SNMP counters
Sometimes the SNMP counter identifier is placed in a different table than a counter. NetCrunch 10.5 introduced a new way of monitoring such complex instances.
- [17.08.2018]Printer monitoring in NetCrunch
Use NetCrunch printer sensor to get information about the status of the printer and the ink level.
- [25.06.2018]How to start monitoring of new SNMP device with NetCrunch
Is your device monitorable? Read the article to learn how to approach configuring monitoring for a new device.
- [07.04.2016] Optimizing SNMP Monitoring in NetCrunch
This article will explain reasons for most common SNMP monitoring problems, describing ways to fine-tune SNMP monitoring settings in NetCrunch. Learn how to monitor without stressing your SNMP device.
- [21.04.2016] Monitoring External Events in NetCrunch
Using multiple tools to catch every SNMP trap or SYSLOG message might be hard. NetCrunch simplifies this task with the External Events window and lets you fine-tune your log and SNMP monitoring: